Edit Menu
Jump to navigation
Jump to search
- Copy / Paste - Move the selected data between separate cells within the spreadsheet or exchange it with any other applications via Windows™ clipboard by means of the Copy and Paste buttons. Copy and paste structures, numerical values, plain text, etc.
- Add Column - Adds an empty column to the spreadsheet. Regardless of the position of the selection cursor at the moment of the addition, the new column will always be added in the last position, i.e. furthest to the right.
- Delete Column - Deletes the currently active (indicated by a darker color heading) column.
- Add Row - Appends an empty row to the active spreadsheet. Regardless of the position of the selection cursor at the moment of the addition, the new row will always be added in the last position.
NOTE: After pasting the molecule into the Structure column of a newly added row the existing columns in the original spreadsheet associated with modules available in the ACD/Percepta (i.e., the ones calculated from within the program) will be automatically updated to provide calculated corresponding property values for the new provided compound. - Delete Row - Deletes the currently active (indicated by a darker color heading) row.
- Hide Column - Hides, but not deletes, the currently active (indicated by a darker color heading) row.
- Show Column… - Opens window to select which columns to be visible if any were hidden.
- Group Column / Remove from Group – Select several columns to group/ungroup them (columns can also be removed from the group one by one). The name of the group that the column is assigned to is indicated in the upper part of its header. Double click on the group name to change it.

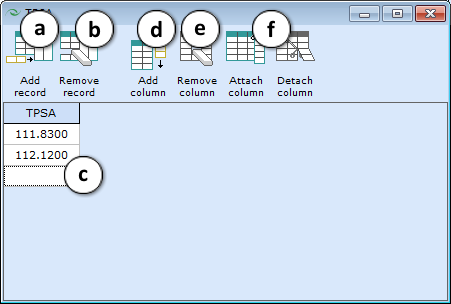
- Multiple Entries - Enables storing more than one value in the cells of the selected column. After setting the Multiple entries flag, double clicking the selected cell will bring up a special Mulitple Entries editor with a few possible options:
- Add record - Adds a blank entry for a new record.
- Remove record - Removes the multiple records one by one depending on the current position of the selection cursor.
- Click the empty cell to start typing in it.
- Add column - Adds an empty column to the spreadsheet and groups it with the currently selected column, or attaches it to the current group (if it already exists).
- Remove col - Deletes the currently active (indicated by a darker color heading) column from the entire spreadsheet.
- Attach / Detach column - Attaches an already existing column to the current group, or removes it from the group (but not from the entire spreadsheet)
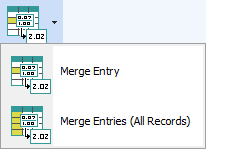
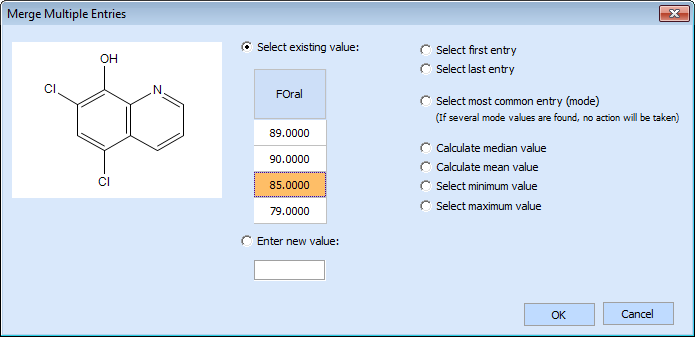
- Merge Entry:
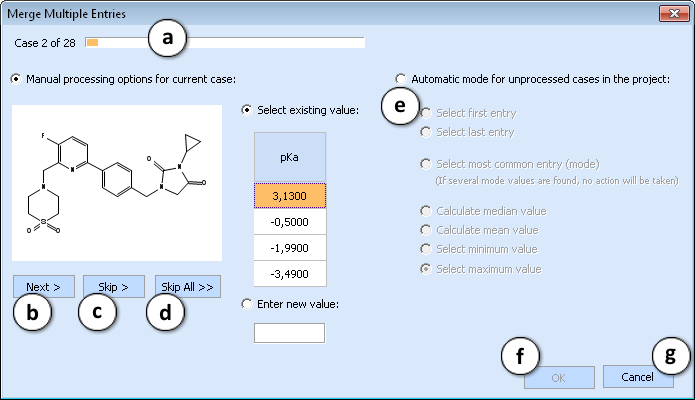
- A progress bar shows the total number of records with multiple entries (cases), and which case is currently being processed.
- Next button accepts the value manually chosen (or entered) by the user and moves forward to the next case in the project.
- Skip button leaves the current case unprocessed and moves forward to the next case.
- Skip All button moves the progress bar to the end of the list and leaves all remaining cases unprocessed.
- Switching to automatic mode results in the selected merging operation being applied to all remaining cases in the project without any further user intervention.
- The actual conversion is performed only when OK button is pressed. In manual processing mode, this button becomes functional only when all cases have been reviewed or skipped.
- Clicking Cancel closes the dialog box without any effect on the actual project. All changes made to the reviewed cases will be lost.
NOTE: If you are midway through reviewing the list of cases and wish to save your work and continue later, click Skip All and then OK. The next time you click Merge Entries (All Records), only those cases that are currently unprocessed will be included in the list.


